Have you ever wanted to compare the operational state of a bunch of network devices between two specific times? Not only if the interfaces are up or down, but the number and status of BGP peers, the number of prefixes received, the number of entries into a MAC-address table, etc?
This is something quite laborious to do with classical NMS or Do-It-Yourself scripts. And this is where pyATS can become a real asset.
Here are my first steps with pyATS: Network Test & Automation Solution.
What is pyATS?
pyATS (pronounced as py-A-T-S) stands for Python Automated Test Systems and was originally developed for internal Cisco engineering use, but it was later made available for the public. Now, it has a large community contributing to it.
The pyATS solution is an end-to-end testing ecosystem. It is extensible by design: it enables developers and network engineers to start with small and simple test cases, and easily scale towards large and complex tests, and build a collection of reusable tests.
pyATS is able to perform a validation of the operational state of the network devices. Or take a snapshot of the operational status of one or more devices on the network and compare it to the operational status after a change (a firmware update or a configuration change for example), and visualize it all in a modern and easy-to-use dashboard.
Personally, before an OS upgrade on a network device, I used to do a number of commands like “show ip ospf nei“, “show bgp all sum“, “show ip route sum“, “show ip arp sum“, etc. To have a reference to compare after the upgrade. Sometimes I even did a “show tech-support” to be sure to catch everything in a text file. But after the upgrade, a comparison was fastidious. Now, imagine you have a tool to do this in two simple commands, and gives you a nice HTML diff as output. What a time saver! And above all, it avoids missing something.
The pyATS ecosystem
The pyATS ecosystem is composed of multiple layers:
- The original pyATS framework, the pyATS core test infrastructure, as the foundation of the ecosystem.
You can find pyATS docs here. - The Genie Library framework, which is a standard open-source, platform/vendor agnostic library system.
You can find Genie docs here. - XPRESSO, a GUI dashboard to manage your test suites, testbeds, test results, and their insights.
You can find XPRESSO docs here. - Multiple bindings to other frameworks in the form of libraries, extensions, plugins, and APIs.
Like, for example, the ROBOT framework. You can find GENIE.ROBOT libs docs here.
The “home” of pyATS is located on the Cisco DevNet website: https://developer.cisco.com/pyats/ where you can find many learning resources.
If like me, you are starting from scratch on pyATS, I recommend watching first Siming Yuan’s presentation: “Cisco pyATS/Genie for Network Engineers” from Cisco Live Europe 2020. A great introduction.
Then, to make further tests, you can use, for example, a virtual environment on your own laptop, your own physical or virtual lab, or a Cisco DevNet Sandbox.
Getting Started
First, I recommend reading the Get started with pyATS documentation. It’s really well written and every single detail is documented here.
The installation part of this documentation gives you all details on how to install pyATS, and also some examples to test the basic functionality of pyATS.
Install on my workstation (Mac)
I choose to first install pyATS on my Mac workstation, as these are Python modules, this is not a big deal:
% pip install --upgrade 'pyats[full]'
For your reference, the GitHub repository of pyATS is here.
Then, the pyats version check command gives you the version of all pyATS packages:
% pyats version check
You are currently running pyATS version: 21.10
Python: 3.9.9 [64bit]

Package Version
---------------------------- -------
genie 21.10
genie.libs.clean 21.10
genie.libs.conf 21.10
genie.libs.filetransferutils 21.10
genie.libs.health 21.10
genie.libs.ops 21.10
genie.libs.parser 21.10
genie.libs.robot 21.10
genie.libs.sdk 21.10
genie.telemetry 21.10
genie.trafficgen 21.10
pyats 21.10
pyats.aereport 21.10
pyats.aetest 21.10
pyats.async 21.10
pyats.connections 21.10
pyats.contrib 21.10.1
pyats.datastructures 21.10
pyats.easypy 21.10
pyats.kleenex 21.10
pyats.log 21.10
pyats.reporter 21.10.1
pyats.results 21.10
pyats.robot 21.10
pyats.tcl 21.10
pyats.topology 21.10
pyats.utils 21.10
unicon 21.10
unicon.plugins 21.10
And the pyats version update command will update all packages:
% pyats version update
Checking your current environment...

(...)

Uninstalling existing packages...
Installing new packages...
Done! Enjoy!
Test the installation
Okay, now we have pyATS installed. The documentation suggests testing the installation:
- To test the installation, from the current (pyATS) directory, clone the Git examples repository:
% git clone https://github.com/CiscoTestAutomation/examples
- Run the following example:
% pyats run job examples/basic/basic_example_job.py
Result: pyATS runs three sample test cases, and displays a summary of the results.
Then, you can type pyats logs view to open the HTML report.
The testbed YAML file
Now it’s time to define some devices to test. As for other object-oriented tools, this is done into a YAML file called “testbed”.
The YAML file includes two parts: the mandatory devices part, and the optional topology part:
- The devices block contains a description of each network device, including the os, type, platform, credentials, IP, connection type, etc. Where:
- The platform key is recommended, but not mandatory. I strongly recommend specifying it, without it, I have found that some tasks are much slower.
- The hostname key must match the prompt of the device.
- The alias key identifies the device during the script execution. This may be useful to reuse a script on another topology, when a device is assigned the same alias, like ‘uut’, meaning Unit Under Test.
- The protocol key is the protocol used to connect to the device. Currently: Telnet, SSH, REST, RESTCONF, and NETCONF are supported.
- The topology block is optional. You can start using pyATS without this part. It contains the interfaces and links details of the testbed. But it can be useful during more advanced tests, to specify values/tests for named links.
The testbed YAML file can be created manually, with your favorite text editor, or imported/converted from a CSV or an Excel file. This option is quite nice to start quickly.
The pyats create testbed command automatically converts the input and creates an equivalent YAML file:
% pyats create testbed file --path my_devices.xlsx --output my_testbed.yaml
Testbed file generated:
my_devices.xlsx -> my_testbed.yaml
The format of the CVS file, as a sample Excel file, are available on the documentation.
Here is an example of a YAML testbed file I use with two Nexus 9300 switches:
% cat my_testbed.yaml
testbed:
    name: NXOS_Testbed
    credentials:
        default:
            username: admin
            password: admin

devices:
    n9300-labE:
        alias: n9300-labE
        type: nxos
        os: nxos
        platform: n9k
        connections:
            defaults:
                class: 'unicon.Unicon'
            ssh:
                protocol: ssh
                ip: "172.17.17.1"
    n9300-labF:
        alias: n9300-labF
        type: nxos
        os: nxos
        platform: n9k
        connections:
            defaults:
                class: 'unicon.Unicon'
            ssh:
                protocol: ssh
                ip: "172.17.17.2"
...
The pyats validate testbed [file] command is useful to test and validate the YAML file:
% pyats validate testbed tb.yaml
Loading testbed file: tb.yaml
--------------------------------------------------------------------------------

Testbed Name:
NXOS_Testbed

Testbed Devices:
.
|-- n9300-labE [nxos/n9k]
`-- n9300-labF [nxos/n9k]

YAML Lint Messages
------------------

Warning Messages
----------------
- Device 'n9300-labE' has no interface definitions
- Device 'n9300-labF' has no interface definitions
Connect to a device … and disable the config commands
Now, as we defined the testbed YAML file, we can try to connect to a device. There are different methods for this. And again, I would advise you to refer to the documentation which is very complete.
Personally, I use the interactive pyATS shell, which allows me to see all the details directly from the cli. For example:
% pyats shell --testbed-file tb.yaml
Welcome to pyATS Interactive Shell
==================================
Python 3.9.9 (main, Nov 21 2021, 03:23:42)
[Clang 13.0.0 (clang-1300.0.29.3)]

>>> from pyats.topology.loader import load
>>> testbed = load('tb.yaml')
-------------------------------------------------------------------------------
>>> dev = testbed.devices['n9300-labE']
>>> dev.connect()

2021-11-29 11:05:03,957: %UNICON-INFO: +++ n9300-labE logfile /tmp/n9300-labE-cli-20211129T110503955.log +++
2021-11-29 11:05:03,958: %UNICON-INFO: +++ Unicon plugin nxos/n9k +++
2021-11-29 11:05:04,417: %UNICON-INFO: +++ connection to spawn: ssh -l admin 172.17.17.1, id: 4615097120 +++
2021-11-29 11:05:04,417: %UNICON-INFO: connection to n9300-labE
-----------
Password:
(...)
n9300-labE#
2021-11-29 11:05:05,188: %UNICON-INFO: +++ initializing handle +++

2021-11-29 11:05:05,341: %UNICON-INFO: +++ n9300-labE with alias 'ssh': executing command 'term length 0' +++
term length 0
n9300-labE#

2021-11-29 11:05:05,645: %UNICON-INFO: +++ n9300-labE with alias 'ssh': executing command 'term width 511' +++
term width 511
n9300-labE#

2021-11-29 11:05:05,972: %UNICON-INFO: +++ n9300-labE with alias 'ssh': executing command 'terminal session-timeout 0' +++
terminal session-timeout 0
n9300-labE#

2021-11-29 11:05:06,122: %UNICON-INFO: +++ n9300-labE with alias 'ssh': configure +++
config term
Enter configuration commands, one per line. End with CNTL/Z.
n9300-labE(config)# no logging console
n9300-labE(config)# line console
n9300-labE(config-console)# exec-timeout 0
n9300-labE(config-console)# line vty
n9300-labE(config-line)# exec-timeout 0
n9300-labE(config-line)# terminal width 511
n9300-labE(config-line)# end
n9300-labE#
>>>
Note: I removed some useless lines from the output, for better readability.
As you can see from the output above, Unicon (pyATS connection implementation) issues some commands, in terminal mode, and in configuration mode, for instance:
- no logging console
- term length 0
- term width 511
- exec-timeout 0 on vty and console lines.
This is to avoid problems when parsing the devices, like getting “press any key to continue” input or similar. I totally understand this, but I don’t understand why it also needs to write this in configuration mode. And for security reasons, I don’t like it at all. For me, if a tool needs only to gather data from a device, it should use read-only credentials.
The good news is, this behavior can be disabled, on the connect command, with:
>>> dev.connect(init_config_commands=[])
But I was unable to make it work. Even with: dev.connect(init_config_commands=[]) or with: dev.connect(init_exec_commands=[], init_config_commands=[]), both gives the same result and do the enable and configuration parts anyway.
Hopefully, it is also possible to disable this behavior by adding special arguments on the testbed YAML file, for instance:
 n9300-labF:
     alias: n9300-labF
     os: nxos
     type: nxos
     platform: n9k
     connections:
         defaults:
             class: 'unicon.Unicon'
         ssh:
             protocol: ssh
             ip: 148.187.137.22
             arguments:
                 init_config_commands: []
                 connection_timeout: 120
Here, I added two new arguments on the connection part:
- The init_config_commands key, followed by a list of commands, in this case: an empty list, to avoid the need to edit the configuration.
- And the connection_timeout key, where I specified 120 seconds.
- Other key arguments are accepted, like:
- learn_hostname
- prompt_recovery
- init_exec_commands
- init_config_commands
- mit
- log_stdout
- debug
- goto_enable
- standby_goto_enable
And with this example, it works! But I have to see if there is an impact on some complex tests later. Do it at your own risk.
Solutions examples
Now it’s time to try some real examples. For this, there is a repository containing several examples scripts here: https://github.com/CiscoTestAutomation/solutions_examples
As explained above, do this in a virtual environment. Then you just have to clone the repository, do the pip install of the requirements.txt (tabulate in this case), and you are good to go.
I tested several of these scripts with my own testbed composed of Nexus switches, and I found that some of them are really useful, like:
- crc_errors – To check the CRC errors on the interface counters.
- bgp_adjacencies – To check if all BGP configured neighbors are in an established state.
- running_vs_startup – To search the differences between the running-config and the startup-config. Here is an overview of the report:
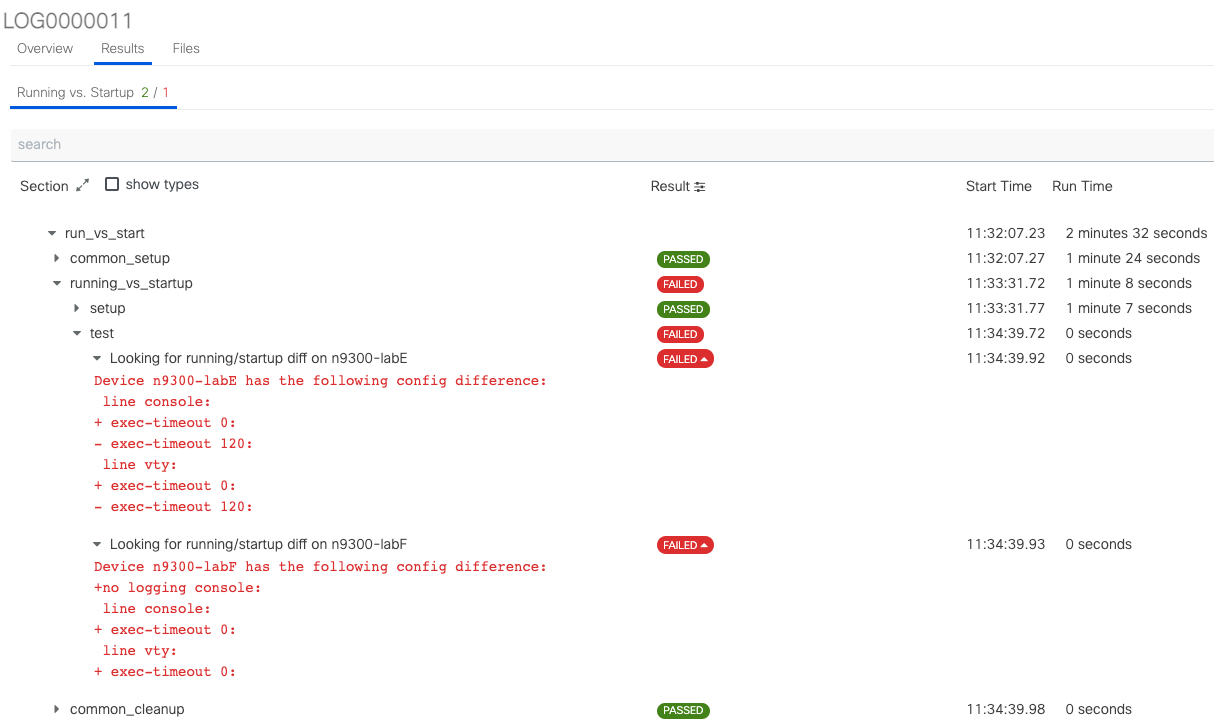 (click on the image to see a larger view)
I remember when I was a consultant, I had a customer with hundreds of devices, and I did the same comparison. Over 60% of the devices had differences! At that time, I did this with a script that made a TFTP copy of both config (startup and running) for each device, and then a diff in bash… another era. This pyATS script could have been a great help!
Robot
Another example is the robot_compare one. This example leverages the robot framework to abstract the pyATS framework and simplifies the syntax of the tests.
Here, we write .robot files, which have an easy and more human-readable syntax.
Robot Framework support is an optional component under Genie. The installation with pip is simple:
% pip install --upgrade genie.libs.robot
Then, you can use the example of the GitHub page. Or read the documentation.
On my side, I made some minor changes in relation to my testbed:
% cat compare_snapshot.robot
# Take initial snapshot of the operational state of the device
# and save the output to a file

*** Settings ***
# Importing test libraries, resource files and variable files.
Library ats.robot.pyATSRobot
Library genie.libs.robot.GenieRobot

*** Variables ***
# Define the pyATS testbed file to use for this run
${testbed} tb.yaml

*** Test Cases ***

Connect
    use testbed "${testbed}"
    connect to device "n9300-labE"
    connect to device "n9300-labF"

Profile System
    Profile the system for "config;interface;platform" on devices "n9300-labE;n9300-labF" as "./second_snapshot"

Compare Profiles
    Compare profile "./initial_snapshot" with "./second_snapshot" on devices "n9300-labE;n9300-labF"
Then, to run it, we use the robot framework:
% robot initial_compare.robot
% robot compare_snapshot.robot
Optionally, we can set the output files to be written in a directory of an HTTP server:
% robot --outputdir /var/www/html/compare_run initial_compare.robot
% robot --outputdir /var/www/html/compare_run compare_snapshot.robot
For this example, we compare very basic elements between the initial snapshot and the 2nd snapshot. But we can add many options.
Once again, my advice is to read the very good documentation to build more complex test cases.
Next steps
This was my first step with pyATS: Network Test & Automation Solution. But I’ve only scratched the surface. Now it’s time to dig deeper!
This will be part of a second post, or maybe more.
And there is also the XPRESSO interface that I want to try out. So lots of new stuff coming up.
To be continued…
This had me stumped when using the shell “dev.connect(init_config_commands=[])” arguments option in the testbed is a great fix, thank you for the great writeup!
Many thanks to you for your comment. I’m happy it helps.
Cheers,
Jerome