As you can see here, I have been using Cisco Nexus NX-OS for many years. And even more intensively since a few months, as I work for a data center now.
During all this time, I accumulated a nice collection of NX-OS tips and tricks. Here it is. I hope this can help you to improve your daily work.
Hexadecimal / Decimal conversion
- The dec and hex commands can convert hexadecimal to decimal and the inverse. For example:
n9k# hex 255
0xff
n9k# dec 0x100
256
n9k#
Executing multiple CLI commands in one command
- Example:
n9k# show clock ; show switchname ; show license host-id
22:21:34.231 CEST Fri Sep 20 2019
Time source is NTP
n9k
License hostid: VDH=TBM12351230
- It works also in configuration mode:
n9k# conf t ; hostname n9k-TEST ; end
Enter configuration commands, one per line.  End with CNTL/Z.
n9k-TEST#
- Nice example to see the time took by the CLI to execute the command:
n9k# show clock ; show switchname ; show clock
22:26:34.441 CEST Fri Sep 20 2019
Time source is NTP
n9k
22:26:34.498 CEST Fri Sep 20 2019
Time source is NTP
n9k#
Sleep
- You can delay execution of commands:
n9k# show clock ; sleep 10 ; show clock
22:23:28.048 CEST Fri Sep 20 2019
Time source is NTP
22:23:38.116 CEST Fri Sep 20 2019
Time source is NTP
n9k#
Configuration Snapshots and rollback
- You can make a snapshot of a configuration with the command: checkpoint name
This creates a backup of the current configuration with the name name
n9k# checkpoint mycheckpoint
...Done
n9k#
- Then, you can see the current checkpoints with the command: show checkpoint summary
n9k# show checkpoint summary
1) mycheckpoint:
Created by user
Created at Fri, 22:53:09 20 Sep 2019
Size is 60,452 bytes
User Checkpoint Summary
--------------------------------------------------------------------------------
Description: None

2) system-fm-lldp:
Created by admin
Created at Tue, 16:49:34 14 May 2019
Size is 56,911 bytes
System Checkpoint Summary
--------------------------------------------------------------------------------
Description: None

n9k#
- Then, I do a small configuration change on the hostname.
- Now, you can run a “diff” between the current config and the snapshot, using the command: show diff rollback-patch checkpoint name running-config
n9k# config t
Enter configuration commands, one per line. End with CNTL/Z.
n9k(config)# hostname n9k-test
n9k-test(config)# end
n9k-test#
n9k-test# show diff rollback-patch checkpoint mycheckpoint running-config
Collecting Running-Config
Generating Rollback Patch

!!

hostname n9k-test

vdc n9k-test id 1

n9k-test#
- At this point, you can restore the checkpoint config with the rollback command: Rollback running-config checkpoint name atomic
n9k-test# rollback running-config checkpoint mycheckpoint
ADVISORY: Rollback operation started...
Modifying running configuration from another VSH terminal in parallel
is not recommended, as this may lead to Rollback failure.

Collecting Running-Config
Generating Rollback patch for switch profile
Rollback Patch is Empty
Collecting Running-Config
Generating Rollback Patch
Executing Rollback Patch
During CR operation,will retain L3 configuration
when vrf member change on interface
Generating Running-config for verification
Generating Rollback Patch

Rollback completed successfully.

n9k#
n9k#
CLI variables
- You can use variables on the CLI and also on configuration commands:
n9k# show cli variables
VSH Variable List (* = session vars)
-----------------
SWITCHNAME="n9k"
TIMESTAMP="2019-09-20-22.29.54"
n9k#
n9k# tac-pac bootflash:$(SWITCHNAME)-$(TIMESTAMP)-show-tech-all.gz
Show tech detail can take more than 5 minutes to complete. Please Wait ...
n9k#
n9k# dir bootflash: | i show-tech
   34015611    Sep 20 22:40:54 2019  n9k-2019-09-20-22.31.10-show-tech-all.gz
n9k#
- You can also create your own variables:
n9k# config t
Enter configuration commands, one per line. End with CNTL/Z.
n9k(config)# cli var name MYINF interface e1/10
n9k(config)# end
n9k#
n9k# show $(MYINF) counters

----------------------------------------------------------------------------------
Port                                     InOctets                      InUcastPkts
----------------------------------------------------------------------------------
Eth1/10                                         0                                0

----------------------------------------------------------------------------------
Port                                  InMcastPkts                      InBcastPkts
----------------------------------------------------------------------------------
Eth1/10                                         0                                0

----------------------------------------------------------------------------------
Port                                    OutOctets                     OutUcastPkts
----------------------------------------------------------------------------------
Eth1/10                           231807771524466                     175789738428

----------------------------------------------------------------------------------
Port                                 OutMcastPkts                     OutBcastPkts
----------------------------------------------------------------------------------
Eth1/10                                   1266300                              177
n9k#
Accounting logs
- To see who made the last changes and what they do by using the command: show accounting log
- If there are too many lines, do the command: show accounting log | last 10
Command Aliases (a classic)
- This is a very well known command, so I have to put it here:
n9k# config t
n9k(config)# cli alias name wr copy running-config startup-config
n9k#
n9k# wr
[########################################] 100%
Copy complete, now saving to disk (please wait)...
Copy complete.
n9k#
Command Aliases for a user session (less classic)
- You can define alias for the current user session. With the persist argument, you can also save the command alias for future use by the current user account:
n9k# terminal alias persist shintst show interface status
n9k# shintst

--------------------------------------------------------------------------------
Port          Name               Status    Vlan      Duplex  Speed   Type
--------------------------------------------------------------------------------
mgmt0         --                 connected routed    full    1000    --
(...)
Customize terminal settings
- Remove terminal session timeouts:
n9k# show terminal | i Timeout
Session Timeout: 30 minutes
n9k#
n9k# terminal session-timeout 0
n9k#
n9k# show terminal | i Timeout
Session Timeout: 0 minutes
- Set the width / length of the display terminal:
Nice when you don’t want output to break to a new line for long width outputs
n9k# show terminal | i Width
Length: 25 lines, Width: 98 columns
n9k#
n9k# terminal width 300
n9k#
n9k# show terminal | i Width
Length: 25 lines, Width: 300 columns
Grep, less, count
- You can use “grep” instead of “include” on the show commands:
n9k# show int eth1/10 | grep multicast
    0 unicast packets  0 multicast packets  0 broadcast packets
    175478606395 unicast packets  1264673 multicast packets  177 broadcast packets
And there are more options, like:
- Case insensitive matching (-i):
n9k# show int des | grep -i test
Eth1/1        eth    10G     test-1
Eth1/12       eth    10G     Test-12
n9k#
- You can add count to count the lines (count the interfaces with description “test” in this example):
n9k# show int des | grep -i test | count
2
n9k#
Diff
- You can see the differences between the interface counters with the diff argument. Example:
n9k# show int eth1/10 | diff
n9k#
(at the first command you have no output, it takes the "reference")
n9k#
n9k# show int eth1/10 | diff
7c7
<   reliability 255/255, txload 25/255, rxload 1/255
---
>   reliability 255/255, txload 24/255, rxload 1/255
25,26c25,26
<     30 seconds output rate 1000195376 bits/sec, 95761 packets/sec
<     input rate 0 bps, 0 pps; output rate 1.00 Gbps, 95.76 Kpps
---
>     30 seconds output rate 942112632 bits/sec, 90670 packets/sec
>     input rate 0 bps, 0 pps; output rate 942.11 Mbps, 90.67 Kpps
29,30c29,30
<     300 seconds output rate 1800485896 bits/sec, 138192 packets/sec
<     input rate 0 bps, 0 pps; output rate 1.80 Gbps, 138.19 Kpps
---
>     300 seconds output rate 1770948136 bits/sec, 135997 packets/sec
>     input rate 0 bps, 0 pps; output rate 1.77 Gbps, 136.00 Kpps
41,42c41,42
<     175412557922 unicast packets  1264324 multicast packets  177 broadcast packets
<     175413822423 output packets  231306944699930 bytes
---
>     175412712610 unicast packets  1264326 multicast packets  177 broadcast packets
>     175413977113 output packets  231307146937683 bytes
n9k#
- You can do the same with an “inc” filter, for example:
n9k# show int eth1/10 | inc unicast | diff
2c2
< 175430277381 unicast packets 1264463 multicast packets 177 broadcast packets
---
> 175432920374 unicast packets 1264481 multicast packets 177 broadcast packets
n9k#
NOTE: NX-OS creates temporary files for the most current output for a show command for all current and previous users sessions. You can remove these temporary files using the diff-clean command:
n9k# diff-clean ?
<CR>
all-sessions Remove '| diff' temp files from all sessions (past and present!) of current user
all-users Remove '| diff' temp files from all sessions (past and present!) of all users

n9k# diff-clean all-users
By default, the diff-clean command removes the temporary files for the current user’s active session. The all-sessions keyword removes temporary files for all past and present sessions for the current user. The all-users keyword removes temporary files for all past and present sessions for the all users.
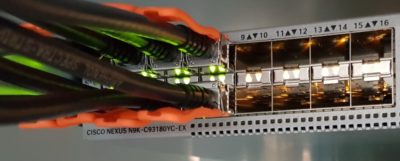
Watch (n9k)
- More or less the same as diff above, but in a different way:
9300# watch differences interval 1 show int eth1/10 counter

This is an image because I was not able to make a copy / past of the terminal
- escape with Ctrl-C
Try also this command for example:
9300# watch show interface counters table
CLI history
- You can display the commands history:
n9k# show cli history
 0  09:52:14   show int status
 1  09:52:38   watch differences interval 1 show int eth1/10 counter
 2  09:52:47   watch differences interval 1 show int eth1/1 counter
 3  09:58:01   show int eth1/10 | diff
 4  09:58:48   show int eth1/1 | diff
(...)
- You can filter this to see only config commands, for example:
n9k# show cli history config-mode
72  22:46:47     cli var name MYINF interface e1/10
n9k#
Send email
- This one could help to quickly take information from a device for later analysis:
n9k#
n9k# config t
Enter configuration commands, one per line. End with CNTL/Z.
n9k(config)# email
n9k(config-email)# smtp-host xx.xx.xx.xx smtp-port 25
n9k(config-email)# vrf management
n9k(config-email)# from admin@my-company.com
n9k(config-email)# reply-to admin@my-company.com
n9k(config-email)# exit
n9k(config)# exit
n9k# show email
SMTP host: xx.xx.xx.xx
SMTP port: 25
Reply to: admin@my-company.com
From: admin@my-company.com
VRF: management
n9k# show version | email subject show ver
Email sent
n9k#
- You can do the same without configuration, only on command line:
n9k# show version | email vrf management smtp-host xx.xx.xx.xx smtp-port 25 from n9k@mycompany.com subject test toto@mycompany.com
Email sent
n9k#
Accessing VRF-Context
- This is really a useful one if you work with many VRFs. You can run CLI commands without adding vrf xxx every time:
N7k-LabSW# routing-context vrf management
N7k-LabSW%management# sh ip route
IP Route Table for VRF "management"
'*' denotes best ucast next-hop
'**' denotes best mcast next-hop
'[x/y]' denotes [preference/metric]
'%<string>' in via output denotes VRF <string>

0.0.0.0/0, ubest/mbest: 1/0
    *via 10.48.61.129, [1/0], 1w4d, static
10.48.61.128/26, ubest/mbest: 1/0, attached
    *via 10.48.61.150, mgmt0, [0/0], 1w4d, direct
10.48.61.150/32, ubest/mbest: 1/0, attached
    *via 10.48.61.150, mgmt0, [0/0], 1w4d, local

N7k-LabSW%management#
N7k-LabSW%management# routing-context vrf default
N7k-LabSW# sh ip route
IP Route Table for VRF "default"
'*' denotes best ucast next-hop
'**' denotes best mcast next-hop
'[x/y]' denotes [preference/metric]
'%<string>' in via output denotes VRF <string>
You can see an example of a use-case in this post.
Changing VRF Membership for an interface without losing the L3 configuration
When you enter the vrf member command under an interface, you receive an alert regarding the deletion of interface configurations and to notify the clients/listeners (such as CLI-Server) to delete configurations with respect to the interface.
Entering the system vrf-member-change retain-l3-config command enables the retention of the Layer 3 configuration when the VRF member changes on the interface. It does this by sending notifications to the clients/listeners to store (buffer) the existing configurations, delete the configurations from the old vrf context, and reapply the stored configurations under the new VRF context.
When the system vrf-member-change retain-l3-config command is enabled, the Layer 3 configuration is not deleted and remains stored (buffered). When this command is not enabled (default mode), the Layer 3 configuration is not retained when the VRF member changes.
switch(config)# system vrf-member-change retain-l3-config
Warning: Will retain L3 configuration when vrf member change on interface.
Attach to a module (n7k, not tested on n9k5 yet)
- Once attached to module, the commands are in the default VDC. Or you need to specify VDC # for related command. Example:
n7k# show module
Mod  Ports  Module-Type                         Model              Status
---  -----  ----------------------------------- ------------------ ----------
1    12     10/40/100 Gbps Ethernet Module      N77-M312CQ-26L     ok
2    12     10/40/100 Gbps Ethernet Module      N77-M312CQ-26L     ok
3    0      Supervisor Module-2                 N77-SUP2E          ha-standby
4    0      Supervisor Module-2                 N77-SUP2E          active *
(...)
n7k#
n7k# attach module 1
Attaching to module 1 ...
To exit type 'exit', to abort type '$.'
module-1#
module-1# show hardware fabric-utilization
------------------------------------------------
Mod  Stage  Total Fabric      Utilization
             Bandwidth     Ingress%  Egress%
------------------------------------------------
1      1     2784 Gbps          0.0     0.0
1      3     1320 Gbps          0.0     0.0
module-1#
module-1# exit
/usr/bin/rl
n7k#
n7k#
Terminal Color
- Use the command: temrinal color to enable color on the terminal.
personally, I don’t like it but up to you.
Cisco NX-OS Graceful Insertion and Removal (GIR)
Bash-Shell (n9k, n3k)
- We can enable the bash-shell feature by the configure command: feature bash-shell
n9k# config t
Enter configuration commands, one per line. End with CNTL/Z.
n9k(config)# feature bash-shell
n9k(config)#
- Then, we can do the command: run bash to by in shell and run the linux commands we want. For example Python 2 here:
n9k# run bash
bash-4.3$
bash-4.3$
bash-4.3$ python
Python 2.7.9 (default, Aug 12 2018, 23:56:37)
[GCC 5.2.0] on linux2
Type "help", "copyright", "credits" or "license" for more information.
>>> import this
The Zen of Python, by Tim Peters

Beautiful is better than ugly.
Explicit is better than implicit.
Simple is better than complex.
Complex is better than complicated.
Flat is better than nested.
Sparse is better than dense.
Readability counts.
Special cases aren't special enough to break the rules.
Although practicality beats purity.
Errors should never pass silently.
Unless explicitly silenced.
In the face of ambiguity, refuse the temptation to guess.
There should be one-- and preferably only one --obvious way to do it.
Although that way may not be obvious at first unless you're Dutch.
Now is better than never.
Although never is often better than *right* now.
If the implementation is hard to explain, it's a bad idea.
If the implementation is easy to explain, it may be a good idea.
Namespaces are one honking great idea -- let's do more of those!
>>> quit()
bash-4.3$
bash-4.3$

We can also be root without problem:

bash-4.3$ sudo su -
root@9300#
root@9300#
root@9300#
So, the possibilities here are limitless. I will dig more into this in another post.
Note: you can also run bash commands from the enable-mode with the command: run bash command
More info can be found on the Cisco Nexus 9k programmability guide.
Others resources
Cisco Nexus tips and tricks page.
Cisco Nexus 9k NX-OS Fundamentals Configuration Guide, Rel. 9.2(x)
Cisco Nexus 9k commands references
pretty cool. man
appreciate it
Thank you very much, Brian. I’m glad this article may help.
Wow. what a great resource. i was looking for some info on NX-Os shell and came across this, excellent content and well laid out. Thank you.
Very helpful !!!
Thank you.
Thank you aboutnetworks for giving me wonderful information about nxos