A Cisco C2960X stack can have up to 8 members, however there is only one master on the stack. Adding a switch to the stack without taking a few precautions can have disastrous consequences.
Prerequisites
First, all stack members must run the same Cisco IOS software image. The same means also the same feature-set.
Then, not all software images are able to be part of a stack:
Stacking is not supported on switches running the LAN Lite image.
And finally, can we mix different C2960 series?
Yes all C2960X models are supported. You can also mix C2960X and C2960S in the same stack but with some restrictions. See below.
Mixed C2960X and C2960S stack
We can create a mixed 2960X/2960S stack but there are some important points to consider:
- The number of supported stack members is reduced from eight to four.
- The stack bandwidth is reduced from 20 Gbps to 10 Gbps, because the stack ports of the 2960S are 10Gbps only.
- Stack convergence time is increased from milliseconds to 1 to 2 seconds.
In a mixed stack of Catalyst 2960X and 2960S switches, you must set the stack port speed of the C2960X switches to 10 Gbps before you add a C2960S switch to the stack. Otherwise, the switches will not stack. Here is how to do this:
eng-lab-ch-bel-s-008(config)#switch stack port-speed 10
WARNING: Changing the stack speed may result in a
stack speed mismatch .
Do you want to continue?[confirm]
New stack speed will be effective after next reload
Stack Master Election
- The switch that is currently the stack master.
- The switch with the highest stack member priority value (1 to 15).
- The switch that has the configuration file.
- The switch with the lowest built-in MAC address.
Stack Member Priority Value
To avoid problems when you attach a new switch into a stack, you have to make sure the switch priority of the new switch is lower than the master, and, if needed, lower than the other members of the stack.
By default, a switch have a priority of 1. If you never set the priority of the existing switches on the stack, they also all have a priority of 1. This is not recommended.
Cisco recommend to assign the highest priority value (15) to the switch that you prefer to be the stack master. This ensures that the switch is reelected as stack master if a reelection occurs.
To do this, go to your existing stack and check the stack status:
test#show switch
Switch/Stack Mac Address : 2c86.d217.6f00
 H/W Current
Switch# Role Mac Address Priority Version State
----------------------------------------------------------
*1 Master 2c86.d217.6f00 10 4 Ready
 2 Member f8a5.c5d9.f300 1 4 Ready
We can see the current master have a priority of 10, and the member have a priority of 1. Let’s change the priority to 15 for the master and to 14 for the member:
test#config t
Enter configuration commands, one per line. End with CNTL/Z.
test(config)#switch 1 priority 15
Changing the Switch Priority of Switch Number 1 to 15
Do you want to continue?[confirm]
New Priority has been set successfully

test(config)#switch 2 priority 14
Changing the Switch Priority of Switch Number 2 to 14
Do you want to continue?[confirm]
New Priority has been set successfully

test(config)#end
test#show sw
test#show switch
Switch/Stack Mac Address : 2c86.d217.6f00
 H/W Current
Switch# Role Mac Address Priority Version State
----------------------------------------------------------
*1 Master 2c86.d217.6f00 15 4 Ready
 2 Member f8a5.c5d9.f300 14 4 Ready
Please note, no reload or reboot is required for this change.
Stack Member Numbers
The stack member number (1 to 8) identifies each member in the stack.
The member number also determines the interface-level configuration number that a stack member uses: Gi1/0/x = member 1, Gi2/0/1 = member 2, and so on.
You can display the stack member numbers by using the show switch command:
test#show switch
Switch/Stack Mac Address : 2c86.d217.6f00
 H/W Current
Switch# Role Mac Address Priority Version State
----------------------------------------------------------
*1 Master 2c86.d217.6f00 15 4 Ready
 2 Member f8a5.c5d9.f300 14 4 Ready
A new switch have a default stack member number of 1. When it joins a switch stack, its default stack member number changes to the lowest available member number in the stack.
To add a new switch into an existing stack, the best is to specify the switch number before adding it to the stack. You can manually change the stack member number by using the command:
eng-lab-ch-bel-s-008(config)#switch 2 renumber 3
WARNING: Changing the switch number may result in a
configuration change for that switch.
The interface configuration associated with the old switch
number will remain as a provisioned configuration.
Do you want to continue?[confirm]
Changing Switch Number 2 to Switch Number 3
New Switch Number will be effective after next reboot
The new number goes into effect after a reboot/relaod of that switch / stack member.
To reload a particular member of a stack, you can use the command:
test#reload slot 2
Proceed with reload? [confirm]
In this example, I reloaded the switch member #2 and it will becomes member #3.
If you manually change the number of an existing stack member and no interface-level configuration is associated with that new member number, that stack member resets to its default configuration. So if you want to “move” the stack number #2 to number #3, you will loose the existing interfaces configuration.
Instead of using the command “show switch”, you can use the switch port LEDs, in Stack mode, to visually determine the stack member number of each stack member.
Provisioning a New Member for a Switch Stack (optional)
If needed, you can provision the new switch before adding it to the stack.
Once done, you can configure the interfaces before the switch is added to the stack. To do this, enter the switch number and the switch model. Example:
test#config t
Enter configuration commands, one per line. End with CNTL/Z.
test(config)#switch 3 provision ws-c2960x-24td-l
test(config)#end
test#show switch
Switch/Stack Mac Address : 2c86.d217.6f00
 H/W Current
Switch# Role Mac Address Priority Version State
----------------------------------------------------------
*1 Master 2c86.d217.6f00 15 4 Ready
 2 Member f8a5.c5d9.f300 14 4 Ready
 3 Member 0000.0000.0000 0 0 Provisioned
Then, the switch member #3 is not physically present, but the interfaces can be configured:
test#show switch
Switch/Stack Mac Address : 2c86.d217.6f00
 H/W Current
Switch# Role Mac Address Priority Version State
----------------------------------------------------------
*1 Master 2c86.d217.6f00 15 4 Ready
 2 Member f8a5.c5d9.f300 14 4 Ready
 3 Member 0000.0000.0000 0 0 Provisioned

test#!-- Then see if the interface of the new switch exists:
test#show run int gi3/0/22
Building configuration...

Current configuration : 39 bytes
!
interface GigabitEthernet3/0/22
end
In summary, how to add a new member to an existing stack
- Check if the model of the new switch is compatible. If you mix C2960X and C2960S switches, you must adapt the stack port-speed on the 2960X: switch stack port-speed 10
- Check the IOS version, upgrade/downgrade the new switch (or the stack) if needed. I will come back on the upgrade procedure of a stack in a later post.
- Check the status of the existing stack with the command: show switch
- If needed, change the master (and members) priority: switch x priority y
- If needed, change the stack members numbers: switch x renumber y (do not forget to reload the member in this case).
- (Optional) set the priority and number of the new switch (lower priority and number).
- Write the configuration of the new switch and power it off!
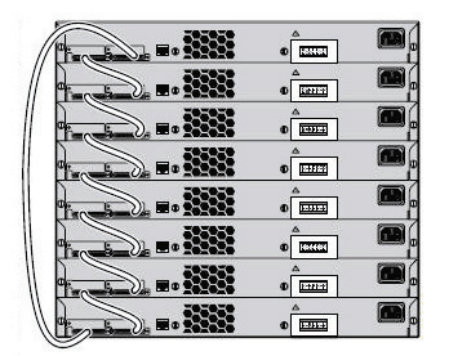
- Plug the stack cables. Usually we cross-connect the cables, like this:
- Plug a console cable to the master or connect to it to see the console messages.
- Power-on the new switch.
Troubleshooting
Enabling Persistent MAC Address
The MAC address of the stack master determines the entire stack MAC address.
When the stack initializes, the MAC address of the stack master determines the bridge ID that identifies the stack in the network.
If the stack master changes, the MAC address of the new stack master determines the new bridge ID and stack MAC address.
You can use the persistent MAC address feature to set a time delay before the stack MAC address changes to the MAC address of the new stack master. For example:
test(config)#stack-mac persistent timer 7
WARNING: The stack continues to use the base MAC of the old Master
WARNING: as the stack-mac after a master switchover until the MAC
WARNING: persistency timer expires. During this time the Network
WARNING: Administrators must make sure that the old stack-mac does
WARNING: not appear elsewhere in this network domain. If it does,
WARNING: user traffic may be blackholed.
When this feature is enabled without any value, the stack MAC address changes in 4 minutes (the default). Or we can specify the time (7 minutes in the above example).
During this time, if the previous stack master rejoins the stack, the stack continues to use its MAC address as the stack MAC address, even if this switch is now a stack member and not the stack master. If the previous stack master does not rejoin the stack during this period, the switch stack takes the MAC address of the new stack master as the stack MAC address.
You can also configure stack MAC persistance to zero, so that the stack MAC address never changes to the new master MAC address:
test(config)#stack-mac persistent timer 0
WARNING: Stack MAC persistency timer value of 0 means that, after a
WARNING: master switchover, the current stack-mac will continue
WARNING: to be used indefinitely.
WARNING: The Network Administrators must make sure that the old
WARNING: stack-mac does not appear elsewhere in this network
WARNING: domain. If it does, user traffic may be blackholed.
In that case, if the entire switch stack reloads, the switch stack uses the MAC address of the stack master.
Accessing the CLI of a Specific Member
You can access specific members by using the command: session X. The member number is appended to the system prompt. For example:
test#session 2

test-2#
test-2#show switch
Switch/Stack Mac Address : 2c86.d217.6f00
Mac persistency wait time: 4 mins
 H/W Current
Switch# Role Mac Address Priority Version State
----------------------------------------------------------
 1 Master 2c86.d217.6f00 15 4 Ready
*2 Member f8a5.c5d9.f300 14 4 Ready
 3 Member 0000.0000.0000 0 0 Provisioned

test-2#exit
test#
Enter exit to return to the CLI session on the stack master. Only the show and debug commands are available on a specific member.
Monitoring the Switch Stack commands
| COMMAND | DESCRIPTION |
show switch |
Displays summary information about the stack, including the status of provisioned switches and switches in version-mismatch mode. |
|
Displays information about a specific member. |
|
Displays detailed information about the stack. |
|
Displays how the stack ports are connected with the stack neighbors. |
|
Displays the stack ring speed, configuration and protocol. |
.