Recently, my license for Cisco VIRL expired and I wanted to test alternatives to have a lab on my laptop.
I got used to install the client and the server parts of VIRL on my laptop, to not have to worry about connectivity when I want to do a lab or a demo to a colleague or a customer. With the exceptional opportunities of the different cloud solutions actually, this is probably not the best solution, but it suits me well for a small lab and I’d like to continue to have this possibility.
So, as an alternative to Cisco VIRL, I had two obvious choices: GNS3 or EVE-NG.
For running one of the three solutions (including VIRL) on a laptop under Windows 10, it is recommended and documented to use VMware Workstation. But have a problem here, I use Microsoft Hyper-V for other VMs tests, as well as for Docker for Windows. And VMware Workstation does not coexist well with Microsoft Hyper-V on the same machine. For example, to start a VM under VMware workstation when Hyper-V start as a service, I must first stop Hyper-V, do a reboot, and then I can start the VM under VMware. Not really sexy.
So, I searched a documentation or a blog post about how to install and run GNS3 or EVE-NG under Hyper-V. Because, after all, this is just an Ubuntu server running on a VM.
For GNS3, I found a pretty good blog, here: https://cisco.zacandsarah.com/node/1
And after two hours I could run my first simulation without any problem. (Note: this blog does not respond from time to time, and currently it seems down).
Then, I wanted to test the same with EVE-NG. In this case, did not find any documentation or post of someone who has already installed it under Hyper-V. I threw a bottle to the sea (Twitter) and got a promising answer that EVE-NG has been successfully installed on Microsoft Azure (see it on YouTube here, a great videos from @theLANtamer). So, I thought, let’s try on Hyper-V!
1. Ubuntu installation
Some basic prerequisites:
- Your laptop must have Hyper-V already installed and a vSwitch already created with Internet access.
- The system requirements for EVE-NG are here: http://www.eve-ng.net/documentation/installation/system-requirement
- The system requirements for Ubuntu server and the installation guide are here: https://tutorials.ubuntu.com/tutorial/tutorial-install-ubuntu-server?_ga=2.142146226.1499346393.1542550531-1914365158.1542019603#0
- For information, I made this install with a Lenovo T450s laptop with Windows 10 pro and 12GB of RAM. So, I assigned 8GB of RAM and 4vCPU to the server. This is probably the minimum to run IOU/IOL and Dynamips images, and insufficient for topology with CSR1000V and/or Nexus-9k. Of course, you must adapt these values according to your own hardware.
Let’s create the VM under Hyper-V and make the Ubuntu install:
- Download Ubuntu 16.04 LTS ISO (be careful, Ubuntu 18 is NOT supported): http://releases.ubuntu.com/16.04/
- Create a new VM under Hyper-V:
- Click on “New Virtual Machine” on Hyper-V
- Name: EVE-NG (you can use any other name, but we will need this name after for a PowerShell change to activate Intel VT-x or AMD-V, so avoid special characters)
- Generation 2
- Startup Memory: I have 12GB on my laptop, so I assigned 8GB, but it depends on your own machine. With dynamic memory enabled.
- Networking: use a vSwitch already existing, connected to the Internet. You must have Internet access during the installation, for the updates.
- Hard-Disk: create a virtual hard-disk, I assigned 300GB. It’s a lot but if you have many images on EVE-NG, you don’t need to resize the disk later. So up to you.
- Install the operating system from a bootable image file: and specify the Ubuntu ISO image you just downloaded.
- Click next, then finish. Hyper-V will now create your VM.
- Once created, on Hyper-V, select your VM, right-click and choose Settings…
- Go under Security and disable Secure Boot. Otherwise the boot with the ISO will not start:
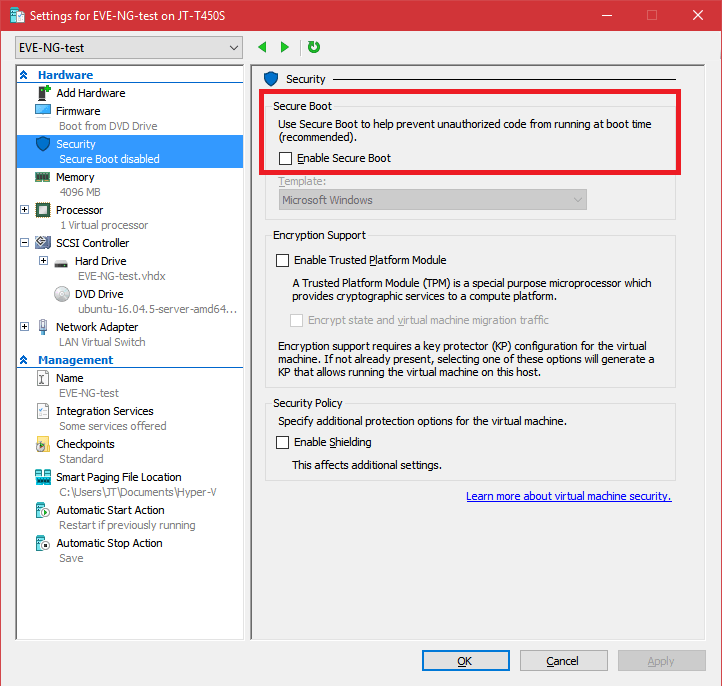
-
- Go under Processor and increase the number of virtual processors, according to your hardware.
- Click OK.
- Connect to the VM and start it. The Ubuntu installation will start, with this message:

(Click on the image to see it full-size)
- Ubuntu Setup:
- Install Ubuntu Server (just hit enter)
- Language: English
- Location: United States
- Configure keyboard: Choose your keyboard or use automatic detection. Having the right keyboard will help you to type correctly the password later.
- If the network of your vSwitch have DHCP, the installation continue automatically, if not please setup IP/mask/GW and DNS IPs manually
- Hostname: eve-ng
- Domain name: anything you want, or example.com
- Full name of user: anything makes you happy
- Username of your account: user (this will be used first time login in to Ubuntu)
- Password: enter password, confirm enter password again
- Use weak password: YES (you will see it only if you entered a weak password above)
- Encrypt your home directory: NO
- Configure Clock: if your DNS IP is set right, time zone is set automatically
- Partition disks: use entire disk and setup LVM
- Partition disks: As you have only one disk, just click continue
- Write changes to disk and create LVM: YES
- Amount of volume: leave the entire offered size
- Force UEFI Installation: YES
- Write changes to disk: YES
- Http proxy: NO. Except if you are using a proxy, then configure it for internet reachability.
- Configuring task: Install security updates automatically
- Software selection: IMPORTANT: add Open SSH server to the selection (mark with spacebar).
- Install GRUB boot loader: YES (must be automatic)
- At the end of the installation: reboot
2. EVE-NG pre-installation
After the reboot, stay on the Hyper-V terminal of your VM to change some first settings. After that, we will use SSH.
This correspond, with some small changes, to the Phase 2 of the bare-install of EVE-NG documentation, here.
- After the reboot, login with your user created during the installation part and get root access:
Login: your_user
Password: your_password
Welcome to Ubuntu 16.04.5 TLS ...
$ sudo su
[sudo] password for your_user: your_password
- Change the root password. Here I use “eve” but of course you can choose your own root password:
root@eve-ng:~# sudo passwd root
Enter new UNIX password: eve
Retype new UNIX password: eve
passwd: password updated successfully
- Change the hosts file to look as below. I still not see the goal of this change but it’s on the documentation:
(If you don’t know VI, you can use nano or another editor of your choice. To install nano, type: apt-get install nano )
root@eve-ng:~# vi /etc/hosts

127.0.0.1       localhost
127.0.1.1       eve-ng.example.com      eve-ng
- Allow the root user to access via SSH [optional]:
root@eve-ng:~# vi /etc/ssh/sshd_config

Change:
PermitRootLogin prohibit-password
To:
PermitRootLogin yes
- Save settings (:wq) and restart the sshd service:
root@eve-ng:~# service ssh restart
3. EVE-NG community installation
Before the EVE-NG community installation, we need to check the Internet access and the domain-name resolution, with the command:
root@eve-ng:~# ping icmp.canireachthe.net
PING icmp.canireachthe.net (209.206.55.10) 56(84) bytes of data.
64 bytes from icmp.meraki.com (209.206.55.10): icmp_seq=1 ttl=51 time=176 ms
64 bytes from icmp.meraki.com (209.206.55.10): icmp_seq=2 ttl=51 time=177 ms
64 bytes from icmp.meraki.com (209.206.55.10): icmp_seq=3 ttl=51 time=176 ms
^C
Do you like this host (canireachthe.net)? Another smart Cisco Meraki idea 🙂
Now, we are ready for the install, be sure you are logged as rood and type:
root@eve-ng:~# wget -O – https://www.eve-ng.net/focal/install-eve.sh | bash -i
All the installation steps are in this script, there is nothing to do. Go get yourself a coffee and relax.
After a while, the installation is complete, reboot the server:
root@eve-ng:~# reboot
Go back to Hyper-V, right-click on your VM and click Connect…

Click start. During the boot, you will see this warning message on the console:
neither Intel VT-x or AMD-V found on Hyper-V
We will solve this later.
Now, you can follow this guide for the first boot configuration:
https://www.eve-ng.net/index.php/documentation/installation/howto-configure-eve-during-first-boot/
Once done, come back here for the next few steps.
If you have not done so already – this was at the end of the guide for the first boot configuration – do an upgrade to latest version, and then shutdown the server:
root@eve-ng:~# apt-get update
(... skipped ...)
root@eve-ng:~# apt-get upgrade
(... skipped ...)
root@eve-ng:~# shutdown now
Finally, we must enable nested virtualization. As I know, the only way to do this is with PowerShell. So, open a PowerShell prompt as administrator on your PC and write this command:
(Where “EVE-NG” is the name of the VM)
> Set-VMProcessor -VMName "EVE-NG" -ExposeVirtualizationExtensions $True
Now, start your EVE-NG VM again with the Hyper-V console, the message “neither Intel VT-x or AMD-V found on Hyper-V” should not appear anymore.
Now, you should be able to connect to the web interface with HTTP – the IP address of the server should appear in the console, just on top of the login:

Username: admin
Password: eve
Congratulations, your EVE-NG is ready!
4. Next steps: import and use the images
The next steps are to import and use the images. I will not spend too much time on it because there is already a lot of documentation on this subject. But, there are a few things to keep in mind:
- Images must be installed on the corresponding directory:
- /opt/unetlab/addons/dynamips for Dynamips
- /opt/unetlab/addons/iol/bin for IOL/IOU
- /opt/unetlab/addons/qemu/xxxx for QEMU, where xxx correspond to a naming-convention you can find here.
- The IOS/IOU images need a license. I let you google this point.
- Read the how-to to upload and use the images, this is important: http://www.eve-ng.net/documentation/howto-s
- Fix the permissions issues with the wrapper: /opt/unetlab/wrappers/unl_wrapper -a fixpermissions
- To copy the images from your PC to the VM, you can use SCP. I use Putty pscp.exe
- Available here: https://the.earth.li/~sgtatham/putty/latest/w64/pscp.exe
- Then the command line to copy the files is pretty simple: pscp foobar.txt your_username@remotehost.edu:/some/remote/directory
Conclusions and other resources
As I wrote at the beginning of this post, with the current possibilities offered by the cloud, at ever lower prices, it is not necessarily useful to have the EVE-NG / GNS3 / VIRL server directly on his machine. Especially that the resources are limited if you want to make a big lab or start few Nexus 9k for example. But, it may be useful to be able to start a small lab in 2 minutes on his own PC, without worrying about Internet connectivity.
For more information, I recommend the following links:
- EVE-NG official site
- Cisco VIRL official site
- GNS3 official site
- David Bombal courses on Udemy (many are on GNS3)
- Thelantamer Twitch Channel and YouTube channel
- Lab-time.it EVE-NG series
Happy labbing!
How can I build an eve lab on hyper-v and connect it to the internet?
Hi Omar,
Thank you for your comment.
I think you should search for this here: https://www.eve-ng.net/forum/
Kind Rgds,
Jerome
2023 Update:
Used 20.04 LTS
16 Repo shutdown use wget -O – https://www.eve-ng.net/focal/install-eve.sh | bash -i
Thank you Christopher,
I just updated the post.
Best,
Jerome
Heya, I am having problems with the script, any ideas how to solve?
wget -O – https://www.eve-ng.net/focal/install-eve.sh | bash -i
I get this error when I run the script
https://www.eve-ng.net/focal/install-eve.sh
Resolving http://www.eve-ng.net (www.eve-ng.net)… 51.89.118.57, 2001:41d0:701:1000::352
Connecting to http://www.eve-ng.net (www.eve-ng.net)|51.89.118.57|:443… connected.
ERROR: cannot verify http://www.eve-ng.net‘s certificate, issued by ‘CN=R3,O=Let’s Encrypt,C=US’:
Issued certificate has expired.
To connect to http://www.eve-ng.net insecurely, use `–no-check-certificate’.
exit
Hi Daniel,
Just read the error message: “To connect to http://www.eve-ng.net insecurely, use `–no-check-certificate’.”
Add –no-check-certificate to your wget command.
Cheers!
Jerome
Thanks for putting this up!
I’m having issues after finishing the virtual machine setup. I’m not getting the IP address displayed on the console (but it’s showing up on ifconfig). I cannot get to the web GUI, as a result. Should I create a new/dedicated virtual switch for the Ubuntu / EVE-NG VM?
Near the end of section 3, the link to the first boot settings needs to be updated. The new link is https://www.eve-ng.net/index.php/documentation/installation/howto-configure-eve-during-first-boot/
Hi Doug, thank you very much for the head-up. I just updated the page.
Best Regards,
Jerome
i am having an issue with vnc console in some qemu images
i am getting an error ” Guest has not initialized the display yet”
heperv is the hypervisor
After the entire installation, telnet does not work in the web interface, so you cannot configure the node
Yes, it is right, neither telnet or ssh dont work. Also i have install eve-ng client.exe from official site. The telnet client was turned on windows features system. How to resolv this problem?
thanks a lot!
thanks you very much. It’s very helpful
Many thanks to you for your comment!
Hello Jerome,
Thanks for your great article, i am going to install EVE-NG on Hyper-V.
i have 8 GB RAM, i5 Intel Vpro.
What Ubuntu server i should use as i use Intel processor ?
Hi,
I suggest you try with 16.04.6 32bit server install:
http://releases.ubuntu.com/16.04/
Best,
Jerome
my fault. i simply should to use default vswitch :0)
only 1 notice: with hyper-v i’ve discovered VM gets the same (if DHCP-configured) address as host PC :0(
as i didnt find how to rerun eve-config at 1st boot, i’ve configured host PC’s NIC (which is effectively vEthernet after External switch introduction) with static IP within my SOHO router private range. after this i became able to ssh & http eve from host PC.
Again, thanks, Jerome , for the gr8 work!
Bravo!
Just wasted an hour troubleshooting weird errors. Found out Ubuntu Server 18 is NOT supported. Shame you left this big warning out. I recommend people to just follow EVE-NG’s documentation for a bare metal installation. Silly me…
https://www.eve-ng.net/documentation/installation/bare-install
Hi Pete, thank you very much for your comment. You are totally right! I just added a remark about the fact that Ubuntu 18 is not supported.
Thank you for pointing that out.
Kind regards
Jerome
Thanks for the instructions. All is working but I do have issues running both IOL and Qemu images at the same time. It actually crashes with a kernal message. All seems fine as long as I do not mix the two types and turn them on. Any Ideals? Not sure it is related to HyperV or not.
I am encountering the same issue. Any solutions?
Hi, thank you for your question. I am sorry but I do not have a solution for this. I had the same problem on my side.
Now, I have to say that since 5 months I am not using Windows anymore on my workstation. I moved to Linux, for many reasons. So my EVE-NG is now running on a VMware VM and everything goes well 🙂
Hi Jerome. Thank you for the tutorial. It worked quite well. I am currently troubleshooting an issue with network connectivity between Cisco IOL routers in EVE-NG and virtual machines in Hyper-V. If you have any recommendations, it would be much appreciated!
More details: https://www.reddit.com/r/HyperV/comments/b377iw/how_to_ping_hyperv_vm_from_eveng_cisco_iol_router/
Nice Article. Thank you
Thanks to you Sanjeev for your comment.
hi
i have a question
in eve scenario devices can communicate with outside environment?
for example we have tow vm on hyper_v
on one of them eve-ng and on the other windows server 2016
in eve-ng scenario we have router
can we see the router from windows server?(do they have ping each other?)
with respect
i believe Hyper_v better use of resource than ESXI
and because i use eve_ng in my laptop Which has few resources hyper_v choice is a great ideas
Tnx
Many thanks to you for your comment!
Best Regards,
Jerome
thanks Jerome Tissieres