Like some other posts, I didn’t think I would write this one because it seemed obvious. But, after talking to a lot of engineers and customers, I realized that not everyone knows this trick. So here it is.
The question is this: how to simulate a real host in a physical network environment when you don’t have computer at your disposal? Well, let’s take an example.
The environment
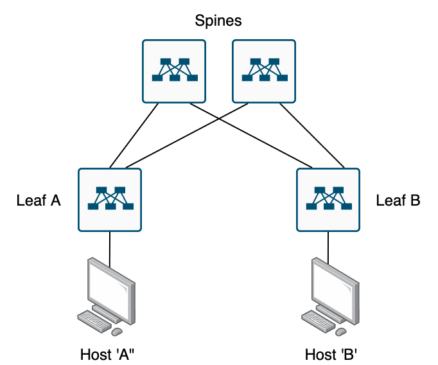
Here is an example with a very simple VXLAN topology consisting of two spines and two leafs. I’m using Cisco Nexus switches for the configuration examples below, but this is probably repeatable with almost any vendor that supports vrf.

Now let’s say you want to simulate traffic between hosts A and B, but you don’t have a physical host to use for this. This is quite common when you are doing a test, lab, or debugging on a real network. How can we do this?
The solution
The solution is quite simple: using a vrf to “simulate” a host, and enter into the vrf context. Let’s see that step by step:
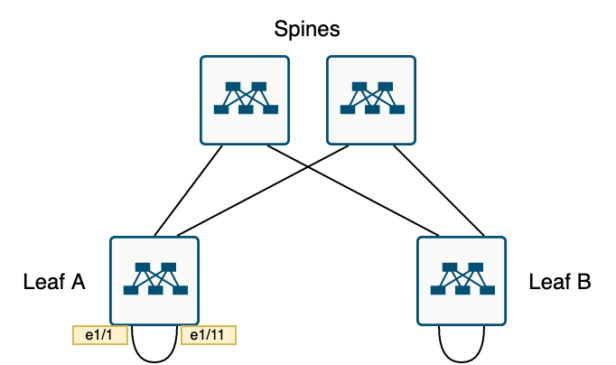
First, plug an Ethernet cable between two ports of each switch, this way:

If we look at Leaf A in detail: let’s say host A is connected in the physical port e1/1, on VLAN 83, with IP address: 192.168.83.11, and IPv6 address: 2001:db8:0083:0083::11/64
Here is the configuration of the port e1/1:
interface Ethernet1/1
description HOST A
switchport
switchport access vlan 83
no shutdown
And here is the trick: we create a VRF to simulate the host A and apply it to the port e1/11:
vrf context A
description VLAN of HOST A
ip route 0.0.0.0/0 Ethernet1/11 192.168.83.1
ipv6 route ::/0 Ethernet1/11 2001:db8:0083:0083::1/64
address-family ipv4 unicast
address-family ipv6 unicast
!
interface Etherent1/11
mac-address 0000.0001.0011
vrf member A
ip address 192.168.83.11/24
ipv6 address 2001:db8:0083:0083::11/64
no ip redirect
no shutdown
Tuning the MAC address is not mandatory, of course, but this may help for debugging: like this, you already know what MAC address you are looking for.
And about the default routes: they represent the default routes that we put on host A, so in most cases, they should be there.
Then, you can make ping and traceroute with the “vrf A” option at the end, that’s one point. But you can also type the command: routing-context vrf A to enter into the vrf A context and “see” the network from the Host A point of view.
To exit this mode, use the command: routing-context vrf default
For our example, just do the same thing on leaf B for host B, and that’s it.
If you have a different solution to do the same thing, please write it in the comments below. I love to hear about creative solutions like this. Thank you.
Header photo by Jordan Harrison on Unsplash

Not sure on nx os , but inter vrf static routes works on xr without the need of physical looping interfaces
Hi Murray,
Thank you for your comment.
You are right, there are probably other ways to do what I describe in this post. As for almost every problem on a network, there are different possible solutions.
What I present here is a simple solution, quick to implement and minimizing the risks if you do it on a production network. Doing route-leaking is, in my opinion, a little riskier in that case.
But maybe I will add your suggestion to this post, as an alternate solution. Or make a post dedicated to route-leaking on nx-os. It’s a good idea.
Thank you
Jerome