Recently, I was involved into a project where we had to deploy a Cisco Meraki vMX100 into Microsoft Azure cloud and build site-to-site and clients VPNs.
The setup process on Azure is relatively simple, however, I lost quite a lot of time on basic issues because the documentation provided by Cisco is not 100% accurate. Here are some tips and tricks to save you time.
Prerequisites and good to know
Here are some prerequisites and good points to know before starting with the Meraki vMX100 on Microsoft Azure cloud:
- You need a Meraki valid license to deploy the Meraki vMX100. You cannot test anything before entering the license. The vMX is not available into the Meraki dashboard before you enter a Meraki license. Moreover, to deploy the vMX into Azure, you need the Meraki authentication token available through the Meraki dashboard only when the vMX is existing.
- The Meraki vMX will work in one-armed concentrator mode only! No NAT mode available. The vMX can only play the role of VPN concentrator on Azure.
- You cannot use the Meraki vMX as a gateway into Azure.
- Full-tunnel site-to-site VPN mode is not possible. Your branch or remote offices need to make split-tunneling VPN: Internet traffic go to the branch/remote office local Internet access, and only Azure remote networks are routed through the VPN. This is the default on Meraki auto-VPN.
- Client VPN is supported on the vMX, but you must use split-tunneling to access to the Internet with a connected client. I give more details on this point in the last part of this post.
Meraki Dashboard Setup
To be able to install the vMX100 VM into Azure, you will need an authentication token from the Meraki dashboard. To generate it, you first need to create the vMX into the Meraki dashboard. So, let’s see this step in details first:
First, create an empty network on your Meraki Organization. Click on: Organization > Create Network
Enter a network name and choose “Security appliance” as network type. Then click on “Create network” without adding any device. Please note: you cannot use a “combined” network for Azure vMX, you must use a “Security appliance” network only.
At that point, you should have this message:
There are no Meraki devices in this network. If you add one we can help you configure it.
Alternatively, if you would like to add a vMX to your network, please add a vMX license to your org and visit this page again.
As you can see, you need to add a license for a vMX.
As soon as you did it, this message is different:

Then, click on “Add vMX” and you will see the vMX available into your network after a while.
Here, you need to click on “Generate authentication token” to generate the token for Azure custom-data field. The token is valid during 60 minutes, so you must add the vMX into Azure within this time. But don’t worry, if the token is expired, you can generate a new one without any problem.
 (Click on the image to enlarge)
At this point, you are ready to deploy the vMX into Azure.
Microsoft Azure VM Setup
Before starting, you must already have your Azure tenant up and running.
Then, you can follow the Meraki documentation here. There is nothing special here, except the following important points:
- You must create a dedicated subnet for the Meraki vMX. Create a smaller subnet inside your vnet supernet. For example, if your vnet is 10.100.0.0/16, you can create a 10.100.200.0/24 subnet for your Meraki vMX.
- You must also create a dedicated resources-group for the Meraki vMX and this resource-group must be empty.
- If you are a CSP, the Meraki vMX is currently not available on the Azure ressrouces. But, there is a workaround using an ARM template on the Meraki documentation here. I tested this with my colleagues and this solution is working at 100%. You can follow this part of the Meraki guide without problem.
Important note: When you create the vMX VM, Azure will create another resources-group, starting with the resources-group you created for the vMX, followed by random numbers. This resources-group is locked and you cannot unlock it. This is absolutely normal.
For example, at the end of the process, you may have one resources-group called “meraki-vmx”, this is the one you created. And another called “meraki-vmx01spkabu7gi5w5z”. Again, this is normal.
At this point, after a few minutes, you can go back to the Meraki dashboard and you should see your vMX up and running:

(Click on the image to enlarge)
Azure Route table
The Microsoft Azure routing is almost automatic: when you create a subnet, this subnet automatically has a gateway created on the lower IP address and, depending of your firewall rules, it must be able to access the other subnets without any other configuration.
With the vMX this is also true, the vMX you created received automatically a LAN IP and a default-gateway. You can see this information on the Meraki dashboard, under: Security Appliance > Appliance status > Uplink
Here, you see the public IP and under “WAN” you can see the WAN interface details:
- IP (DHCP) = The vMX LAN IP, for example: 10.100.200.12
- GATEWAY = The vMX Azure Gateway IP, for example: 10.100.200.1
(on this example, the subnet I created for the xMX was: 10.100.200.0/24).
As you can see, this is not the WAN but the LAN information. This is like this because we use the vMX in one-armed mode and on this mode the WAN physical interface (sometimes called Internet-1) is in use to connect the LAN. Like on a real MX appliance.
At this point, your Meraki vMX is up and running. You can now build a Meraki auto-VPN tunnel with your branches or remote offices. Then, the VPN tunnel will be up, yes, but the routing on the Azure cloud will not work.
As you can also read on the Meraki documentation, at this point the Azure routing is not done. This is correct, but the problem is, the information on how to add static route(s) on this documentation is not complete.
Site-to-site VPN
As you might read on the documentation, you must create a static route for each remote office into the Azure route table, pointing to the LAN IP address of your vMX. Like this, Azure know how to reach the subnet(s) of your remote branches and will route it to your vMX. Here is how to do this:
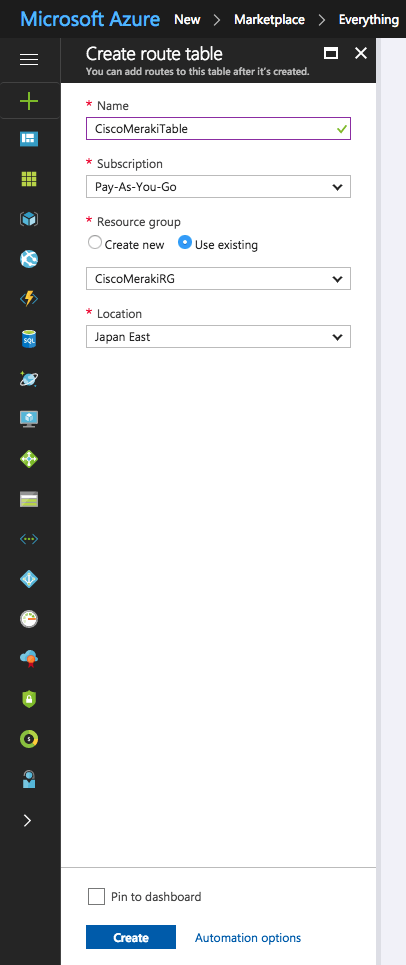
As written in the documentation, to create a route table, click on “new” and then “Route Table”.
Here, create a new route table with a name, subscription and assign it to the resources-group you created for your Meraki vMX. The resources-group you created for the vMX, not the one who was created automatically with random characters.
Into this table, add the subnet(s) of your branches and remote offices, use “Virtual appliance” as Next hop type, and specify the LAN IP address of the vMX as Next hop address. Here is an example:
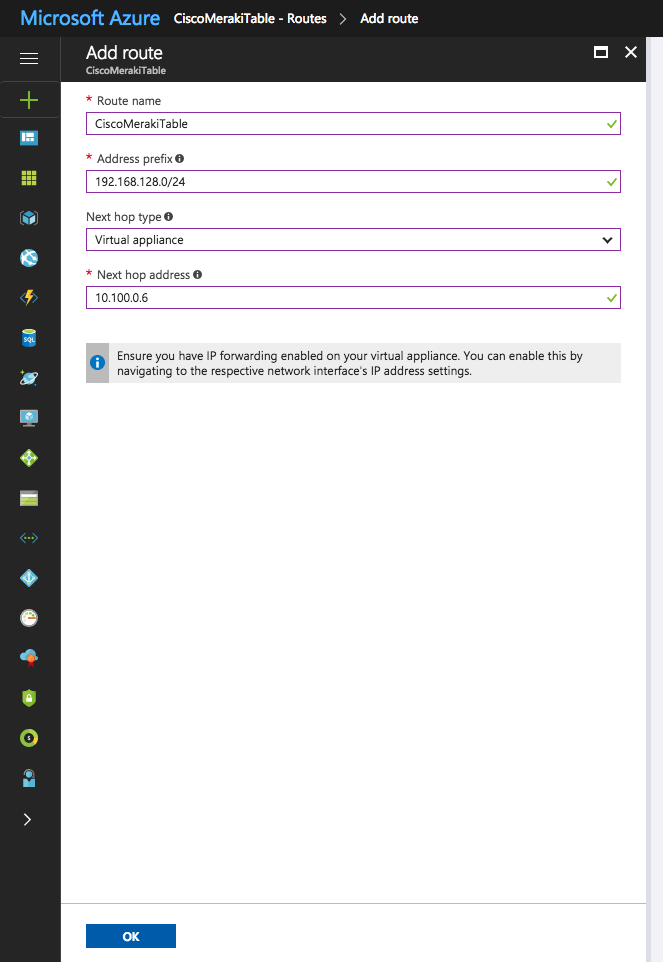
Ignore the IP forwarding warning, the vMX take care of this.
Finally, and this is where the documentation is wrong: associate this network with the subnet(s) of your servers on the Azure cloud.
This “association” means where Azure apply this static route. So, you must associate it with the Azure subnet(s) of your servers, where your branch office(s) need to access. Not with the vMX subnet as written on the Meraki documentation.
For each association, this is the same: choose your “supernet” vnet on step 1, and choose the servers subnet on step 2.
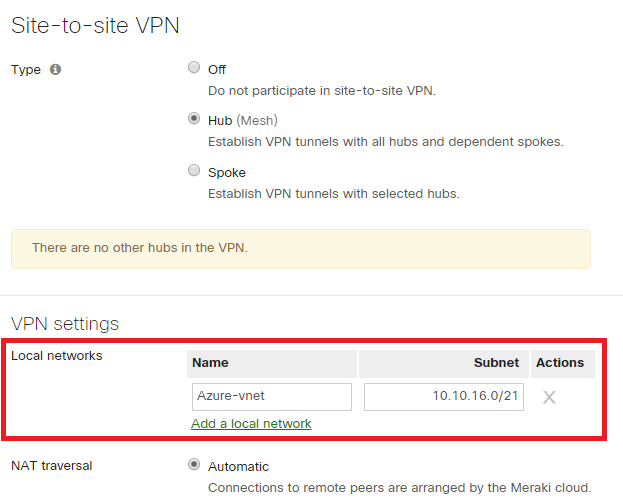
Another important point: on the Meraki dashboard, on the vMX, you must specify the Azure subnet(s) reachable(s) through the VPN tunnel.
Do this into: Security appliance > Site-to-site VPN > VPN settings > Local networks. Like below:
 (Click on the image to enlarge)
Client-VPN on the vMX
I spent many time on this. Basically, the client-VPN tunnel to the vMX into Microsoft Azure is working, but you will not have access to the Internet through the tunnel. This is an Azure NAT limitation on the Azure gateway.
Hopefully, I had a very good support from the Meraki technical support on this problem. Everything was correctly configured, the access from the remote client to the Azure servers was working, but no Internet access.
After investigations, the answer of the Meraki Technical Support was this:
Full tunnel Client VPN to a vMX in Azure is currently not supported, since internet bound traffic coming through the full tunnel can not be forwarded to the internet.
Split tunneling for Client VPN allows traffic to go from the client VPN tunnel to remote subnets reachable via S2S VPN as well as other resources in the same shared Azure network (As long as the routing is setup correctly on the Azure side).
So, if your VPN clients needs to have Internet access, you must configure Split Tunneling, like explained here.
To make the routing part on Azure route table, this is the same setup as above for a site-to-site, but the route must be also applied (associated) to the vMX subnet. Not only to the server(s) subnet(s).
For the Client-VPN subnet configured on the vMX, I tried with a subnet part of the vnet supernet and I also tried with a RFC1918 subnet outside of the vnet supernet; both are working fine.
For example, if your vnet is 10.100.0.0/16, you can use 10.100.101.0/24 as client-VPN subnet. Or, if you prefer something totally outside your vnet, you can take another subnet like 192.168.27.0/24 for example. Just add the corresponding route into the Azure route table and that’s it.
Meraki documentation
Meraki vMX setup guide for Azure:
https://documentation.meraki.com/MX-Z/Installation_Guides/vMX100_Setup_Guide_for_Microsoft_Azure
Meraki One-Armed VPN Concentrator deployment guide:
https://documentation.meraki.com/MX-Z/Site-to-site_VPN/One-Armed_VPN_Concentrator_Deployment_Guide
Configuring Split Tunnel Client VPN:
https://documentation.meraki.com/MX-Z/Client_VPN/Configuring_Split_Tunnel_Client_VPN
Thanks for the very last couple of paragraphs – saved my sanity when trying to get ClientVPN to talk to the Azure VM’s. Feels like there could be some slightly better documentation on the Meraki VMX Azure deployment guide, since a lot of it was obsessed with router mode which isn’t really that useful.
Hi John, I’m glad this article still help.
Cheers,
Jerome
Hi Jerome,
I know this is an old post, but very helpful – thank you!! I have completed the configuration and all is working as expected with VPN access from on-prem to Azure subnets.
The only thing I can’t resolve and was wondering if you might be able to comment – in the Meraki Dashboard, the vMX appliance shows ‘Bad Internet Connection’. Everything is functioning, VPN is up, traffic is moving, but presumably because the vMX is using the LAN IP as WAN, it is not showing normal with the internet connection (the public IP in Azure is functioning and Uplink is as you describe in your article). Any ideas? Thanks!!
Hi and thank you for your comment.
At the time I wrote this article, I had the same issue when I was using an MX through a private (MPLS) link on the LAN and the Internet access was on the other side of the MPLS. In this case, I also had a ‘bad Internet Connection’.
I remember I had a discussion with the support about this and they told me that the Internet status is checked by the MX with a ping to 8.8.8.8 from the WAN interface. And at this moment (a couple of years ago) it was not possible to change that. So in your case, it seems the same behavior.
I think it’s worth opening a ticket and asking to improve this.
I hope it helps.
Best Regards,
Jerome
Following up on this – in our environment, the vMX network interface was inheriting its DNS settings from the virtual network. Those were set to our private DNS servers (on prem, over the VPN). This was working fine, the VPN was up, the vMX able to resolve names when testing use the Tools option in the dashboard. However, after opening a ticket, they suggested I change the DNS servers to publicly accessible choices – I used Googles (8.8.8.8 8.8.4.4), applied, rebooted the vMX VM, and the dashboard status issue resolved as hoped. Thanks again for responding and helping provide insight!
Many thanks to you for the update.
Well, I found it a bit strange that the DNS had an influence on the Internet status of the box. I remembered that MX used to only make a ping to 8.8.8.8, to check the Internet “status”. So this has been changed to something more complex using also DNS requests maybe? That means now if the DNS is not responding what the MX expects, it considers Internet is down… This needs to be improved in my opinion. Or at least customizable by the admin.
Anyway, thanks again for the update, that’s very interesting to know.
Cheers,
Jerome
Hi jerome, great work with this tutorial, better than official, but i’ve one last issue with client vpn.
I’ve added routes on both sides of meraki cloud and azure and i can ping the vmx from inside the old auto vpn, but if i try to connect to the client vpn on azure i get this error:
“L2TP-PSK” #1: we require IKEv1 peer to have ID ”, but peer declares ‘10.1.0.4’
and i don’t find any help regarding this. I’ve also deleted and recreated everything following all things step by step without result. Any suggestion?
Thanks in advance for your help, i’m very glad of that
Ran into the same issue, did you find a resolution?
Hello Jerome!
First off, awesome post! Almost life saving some might say!
I have this setup, in a slightyl different way and wondering if you couldlet me know your thoughts?
I have the vMX100 in its own VENT/Subnet (i.e.10.200.0.0/24) – Meraki VNET.
I have 2 aditional VNETS one for Servers, and another for a RDS environment.
(ServerVNET 10.140.0.0/21 (as there are multiple subnets) & rdsVNET (10.150.0.0/24)
The Meraki VNET is peered to all my VNET’s in my envionment.
[i.e. Meraki – to – Servers / Meraki – to – rdsVNET. (and Server – to – RDS)]
The peering from Meraki Vnet to the others has “Allow Forwarded Traffic”
I then created the CLIENT VPN in the meraki portal with (i.e. 10.130.0.0/24)
I ensured all my subnets from azure where in thr meraki portal too
I have a route table (in the same resource group as the MerakiVNET ) that suggests:
Route for 10.130.0.0/24 has the next hop being the IP of the vMX100 in the 10.200.0.0/24 range.
Subnets of the route table are the Servers Subnets, RDS Subnet and Meraki Subnet)
I can connect to the Client VPN using meraki authentication, (enabling split tunnel to retain access)
I cannot pint the Meraki
I cannot ping devices in my subnets
I have no idea why.
Meraki support will help with pining the Meraki in Azure, however they cannot help for why ping wont go across to other vNets
My question is, is there anything I have done wrong above?
Best regards,
Adam
Hi Adam,
Thank you very much for your comment.
Your configuration description is very clear and it seems that everything is correct.
I made several tests with the client VPN on the vMX and as soon as the client’s subnet is on your Azure routing table, it works (except Internet access as I explain in the post).
I tried with a subnet part of the Meraki VNET and also with a subnet totally outside and both solutions worked very well to reach the servers.
What you can maybe try is, from one of your server in Azure, ping the first IP of the client VPN subnet. If you use 10.130.0.0/24 for your VPN clients, then the 10.130.0.1 is taken by the MX and responds to ICMP ping. Even if there is no client connected. Like this, you can validate the routing on the Azure side.
I hope this may help you.
Good luck!
Best Regards,
Jerome
Hey Jerome,
Many thanks for your response. I have now resolved the problem.
In the VNET Address Space for the Meraki vMX100 (10.200.0.0/24), I added an additional Address Space to the same VNET that matched the Client VPN (10.130.0.0/24) – all of a sudden I could ping all the way through to the servers in Azure in the different subnets. But not directly the vMX (Seems like it is blocked or something)
The question I had is, the above seems different to how other people have done it, so I am wondering if it is the Route Table I created – Should this look like this?:
===========================================
::Route::
———
Client VPN IP Range (10.130.0.0/24) Next Hop: Meraki vMX100 (10.200.0.4)
==========
::Subnets::
———-
Meraki VPN subnet (VNET for meraki)
Server Subnet (different VNET for servers)
RDS Subnet (Different VNET for RDS servers)
=============================================
And does it matter what resource group it is in? or should it be in the same as the either the: “vMX100 App resource group” or the “vMX VM resource group” or the “vMX VNET resource group”?
Thanks for your time and really appreciate you taking a look – your posts on Meraki forums and this blog have been extremely helpful.
Hi Adam,
Thank you very much for your feedback!
Well, yes the networks should be on the same ressource group, otherwise they will not communicate.
If you need to VNETs not on the same ressource-group to communicate, you must do a VNET peering, but I never tried it. On the tests I made, all my VNET were on the same ressource group. And in that case, the route table you wrote above is correct.
I hope this helps.
Best Regards,
Jerome
Does anybody know what OS the vMX100 is running? Meraki documentation says to select a D2_V2 *with* a Windows license. I have a very hard time believing this is the case! Does anybody know if there is a reason not to set up the VM as a Linux instance?
Hi Michael,
Where do you see we need a Windows License?
As I can see, they say to select a standard d2_v2 VM but nothing more.
But I maybe miss this on the doc, because I installed the ARM package.
Thank you,
Best Regards,
Jerome
Excellent step by step guide. In particular, very good tips and tricks that will prevent us from wasting a lot of time.
This can even give us great help for other solutions in their Azure version.
Many thx
Thank you very much Manu!